API Integration for Service Partners
Become an OTTO Market service partner (developer)
Follow these steps:
- Go visit servicepartner.otto.market
- Inform yourself about the process of integration
- Register as a developer
- Get access to our partner portal "OTTO Partner Connect (OPC)" as developer
- Provide all necessary documents and data to get further access
- Get yourself familiar with the Service Partner Program
- Have a look at the first Use-Cases
- Learn how to test our interfaces within the sandbox section
- Request production access within the "OTTO Partner Connect (OPC)"
- Create your first OTTO Market App and connect your first seller
Service Partner Program
This section describes how a service partner can integrate with OTTO Market API.
The Service Partner program aims at equipping the service partners with authentication and authorization for accessing the OTTO Market API on behalf of the partner.
Target Group
The Service Partner Program is intended primarily for service partners who want to exchange data for OTTO Market Partners and offer their service to other sellers. OTTO Market Partners who would like to develop their own OTTO Market API connection use their own API user and can find more information here.
Registration as Service Partner
If you want to register as a service partner who needs to access Partner data, please follow the steps at servicepartner.otto.market. You'll receive email notifications for any approval / denial of registration requests.
After submitting your registration you will get access to the basic functionalities of our portal. To tailor your experience and unlock additional features, head over to the Permission Management Section. To start the journey you have to request your first permission for creating Sandbox Apps. With our confirmation, you will receive 30 days' test access to the sandbox environment for getting to know the inferfaces and estimate your effort without completing the registration process. If you decide to integrate, complete the registration by filling out the self-disclosure form. You will receive the form at the end of the 30-day test access period. We will grant you unlimited sandbox access afterwards.
At the point when you decide to go live and roll-out your service, you can request the permission for creating private production apps in the permission management. You need to start working with the production environment in private access first for test and learn with pilot integrations. Afterwards you can request public production access by request the right permission.
For more information about the registration and integration process, please have a look at servicepartner.otto.market.
Private and Public Access for Service Partner
Once you´ve done with testing, requested the permission private production apps, and we confirmed the permission, you can now create private apps in the Production environemnt. (Read more about the difference between private and public apps here
Getting Public Access
If you want to get public access follow the steps below:
- Login to OTTO Partner Connect portal and navigate to the Permission Management
- Request the permission "Public Production Apps"
- Select necessary scopes for your public access
- Done! Your request will be reviewed by OTTO Market. You'll receive email notifications for approval / denial of your request.
Please note: OTTO Market will perform a quality check for each selected scope. You only can go public after passed the quality check and finished an OTTO Market Training. The colleagues will give you more information during the integration process.
Private and Public Apps
Private Apps
Private apps can be created by developer with the permission "Private Production Apps". If a OTTO Market partner wants to install a private app, an unique app invitation link ("Einladungslink") is required.
Generate an app invitation link You can generate an unique app invitation link for an app by following the steps below:
- Login to the OTTO Partner Connect portal.
- Navigate to the OTTO Market Apps and Sandbox Apps page for production and sandbox apps respectively.
- Click on the three dots (…) right to the app name for which you want to create an invitation link.
- In the dropdown menu select "Einladungslink generieren".
- A popup window will be displayed. Copy the link from this window - it will not show up again.
- Done! You can now share the app invitation link with a OTTO Market partner.
Note: You should be aware of the following:
- After closing the popup window with the invitation link you won't be able to see this exact invitation link again.
- You can create as much invitation links as you want to.
- There is no possibility to show all invitation links created for a specific app.
- Every app invitation link is only valid for 24 hours and can be used only once. (When it is used or expired the link will become invalid and you have to create a new one.)
- If a partner clicks on the link but don't grant consent the link remains valid (until it is either expired or consent is granted).
Public Apps
Public apps can only be created developer with the permission "Public Production Apps". (For getting public access refer to Getting Public Access.) In order to install a public app, an universally valid installation link ("Installationslink") is required. After creating a public app this link is displayed in the app details page. You can share this link whereever you want. You can also add an optional parameter "state" to this installation link, which preserves the state of your application page and returns user back to that state after they install. If this optional parameter exists, the user will be redirected to app's callback URL along with the optional state. But be aware that it is universally valid meaning you cannot control which partner will install your app.
Scopes
Scopes corresponds to OAuth scopes. They are used for providing fine-grained access control to the OTTO Market APIs. Scopes need to be used via the authorization in the client credential flow or the authorization code flow.
In addition to the interfaces in your app overview, each interface must also be listed as a scope in the token request.
Scopes for OTTO Market APIs
The below table gives mapping of displayed scope names in UI to the scope names to be used for fetching token
| Display Name | Scope Name (To be used in fetching token) |
|---|---|
| Installation | installation |
| PartnerId | partnerId |
| Developer | developer |
| Products | products |
| Orders | orders |
| Receipts | receipts |
| Returns | returns |
| Price Reduction | price-reduction |
| Shipments | shipments |
| Shipping Profiles | shipping-profiles |
| Availability | availability |
| Returns Warehouse Read | returns-warehouse-read |
| Returns Warehouse Write | returns-warehouse-write |
| Sponsored Product Ads | advertising-services |
| Sponsored Product Ads Reporting | advertising-services |
Content declaration of available scopes
Installation
The installation interface allows a service partner to get the installation details of a seller.
PartnerId
The partnerId interface allows a service partner, access to the partner's partner id.
Developer
The developer interface allows a service partner to fetch an installation token
Products
The product interfaces allow a service partner to manage product data of a seller in the OTTO Market, which means sending products for publishing on OTTO.de, to view the sent data, and to manage the visibility of the products on otto.de.
Read more about the technical possibilities here.
Shipping Profiles
This interface allows a service partner to create, modify, and manage shipping profiles for a seller.
Read more about the technical possibilities here.
Availability
Once the products have been successfully transmitted using the products scope, the service partner needs to send the quantities on behalf of the seller to make the products available to end customers on OTTO.de. Additionally, the service partner needs to connect the SKUs to existing shipping profiles to provide delivery information. For this purpose, the Availability Interface allows service partners to update the necessary information to make a seller’s SKUs available on OTTO.de.
Read more about the technical possibilities here.
Orders
This interface allows service partners to view orders and associated position items on behalf of the seller. It also allows service partners to send cancellations at the order and position item levels for the seller.
Read more about the technical possibilities here.
Shipments
Service partners should use this interface to report that shipments have been handed over to the carrier for final delivery to the customer on behalf of the seller. Service partners can also access return shipments to retrieve track and trace data for returns from the customer to the seller’s warehouse.
Shipments - Read more about the technical possibilities here.
Return-Shipments - Read more about the technical possibilities here.
Returns
This scope enables the service partner to manage returns on behalf of the seller. This includes retrieving a list of announced returns, as well as accepting and declining returns.
Read more about the technical possibilities here.
Receipts
OTTO Market provides receipts to customers to document financial processes. This scope enables service partners to download these documents as PDF or JSON files on behalf of the seller.
Read more about the technical possibilities here.
Price Reduction
This endpoint enables sellers to apply price reductions to shipped products if the customer is unsatisfied and asks for a partial refund instead of returning the product completely.
Read more about the technical possibilities here.
Returns Warehouse
This scope allows service partners to manage return warehouse addresses and carriers on behalf of the seller. The Return Warehouse Read scope enables service partners to view a seller’s addresses and carrier details, while the Return Warehouse Write scope allows them to create and update those addresses and carriers.
Read more about the technical possibilities here.
Advertising Services
This scope covers the Sponsored Product Ads interfaces, allowing service partners to manage advertising campaigns and access performance reporting on behalf of sellers.
The Sponsored Product Ads interface enables service partners to create and manage ad campaigns that promote a seller's products in OTTO search results and product listings. This includes managing campaign settings (budget, pacing, dates), adding target products (SKUs), and configuring keywords for manual campaigns. This interface is currently available in sandbox only.
Read more about the technical possibilities here.
The Sponsored Product Ads Reporting interface provides performance metrics and on-demand report generation for Sponsored Product Ads campaigns. Service partners can retrieve pre-aggregated KPIs for campaigns and products, or generate full CSV reports for campaigns, products, and keywords on behalf of the seller. This interface is currently available in sandbox only.
Read more about the technical possibilities here.
Rate Limiting
In general the rate limits for each individual endpoint can be found: here
Exceeding the rate limit results in a HTTP 429 "too many requests" error.
In the following you can find specific rate limits in the process for the Installation of app by an OTTO Partner.
| Endpoint path | HTTP method | Max requests per time unit |
|---|---|---|
/v1/apps/{appId}/installations/{installationId}/accessToken | POST | 100 per second for each service partner |
Sandbox vs Production
Sandbox apps are used to test your API in sandbox environment, when you are approved for the permission "Sandbox Apps" by the OTTO Market team. These apps have unrestricted scopes access, so you can create sandbox apps for any scope even if you don´t need them in the production environment. For creating and testing with sandbox apps, please see Access to Sandbox.
As the name states, production apps are for production environment. This can be created after you have an approval from OTTO Market team for the permission "Private Production Apps". Once you have the approval, you can request for "Public Production Apps", to create public apps. An OTTO Market Partner has to provide consent, in order for you to access their production data. The detailed flow is described in the Access to Production section below.
Access to Sandbox
Once your permission request for "Sandbox Apps" is approved, you can start using Sandbox Apps.
Creating sandbox test users
In Usermanagement UI Service Partners can create their own test users for sandbox. This test user can be used for authenticating against sandbox apps
Valid email is required for sandbox users. Upon creation of user, a password setting mail will be sent to the given sandbox user emailId
Please note: Sandbox users are considered as part of the service partner count itself. You can create a max of 10 users (service partners + sandbox) by default.
Please also have a look in the Download section of servicepartner.otto.market. There you can find a Step-by-Step Sandbox guide for testing the integration (here).
Creating sandbox apps
In create apps UI, you need to provide the following details,
- unique name
- homepage URL
- authorization callback URL - Refer below section for more info
- scopes - All scopes will be listed in sandbox.
- app type - Refer Private and Public Apps for more info
Post Installation Redirect URL
Test Partner will be redirected to your post installation redirect URL after successfully installing your app.
Authorization callback URL
- Post successful redirection, you will initiate authorization code flow. Test Partner logs in with their credential. On verifying identity, partner will be redirected to your app's authorization callback URL with auth code.
- If you intend to incorporate query parameters in your REDIRECT_URI, ensure to suffix the url with an asterisk (*)
App ID
A unique app ID which will be used for identifying a service partner app. When a partner installs this app, this app ID will be used for fetching the installation details.
Installation Link
This unique, publicly accessible link is intended for OTTO Market partners to facilitate app installation.
-
Optional State Parameter: An optional
"state"parameter can be added to the installation link to retain the application page’s state. If this parameter is provided, it will be preserved and included in the app’s Post Installation Redirect URL. If thestateparameter is not provided, the user will still be redirected to the Post Installation Redirect URL, but without thestatedata. -
Reinstallation Behavior: If a partner has already installed the app and clicks the installation link again, they will be redirected to the Installations Overview in their OPC account, bypassing the standard installation flow.
You can simply add this link as a hyperlink on your website for convenient partner access.
Client ID & Client Secret
Credentials to be used for authenticating & authorising your app with OTTO authorisation server for fetching installation details of partner
IP Addresses
If IP addresses are specified for a credential set, requests will only be successful if they originate from those addresses. If no IP addresses are provided, the credential set will expire every 180 days.
Version
Denotes the version of the app
Version End Date
This version will remain functional until the specified date. Any changes must be scheduled at least 4 weeks in advance(Note:- Once an app version end date is set, it cannot be modified. Please contact the helpdesk if an update is required.)
Activation Date
Date when communication with partners begins for a new version release.
Access to Production
Once you are satisfied with everything you have tested in the sandbox, you can request the permission "Public Production Apps" in the permission management in the OTTO Partner Connect Portal. When approved, you can start creating production apps using OTTO Market Apps in OTTO Partner Connect.
Creating apps
In create apps UI, you need to provide the following details,
- unique name
- homepage URL
- authorization callback URL - Refer below section for more info
- scopes - Only scopes approved for you will be shown
- app type (only if the service partner has public access)
Post Installation Redirect URL
Partner will be redirected to your post installation redirect URL after successfully installing your app.
Authorization callback URL
- Post successful redirection, you will initiate authorization code flow. Partner logs in with their credential. On verifying identity, partner will be redirected to your app's authorization callback URL with auth code.
- If you intend to incorporate query parameters in your REDIRECT_URI, ensure to suffix the url with an asterisk (*)
App ID
A unique app ID which will be used for identifying a service partner app. When a partner installs this app, this app ID will be used for fetching the installation details.
Installation Link
This unique, publicly accessible link is intended for OTTO Market partners to facilitate app installation.
-
Optional State Parameter: An optional
"state"parameter can be added to the installation link to retain the application page’s state. If this parameter is provided, it will be preserved and included in the app’s Post Installation Redirect URL. If thestateparameter is not provided, the user will still be redirected to the Post Installation Redirect URL, but without thestatedata. -
Reinstallation Behavior: If a partner has already installed the app and clicks the installation link again, they will be redirected to the Installations Overview in their OPC account, bypassing the standard installation flow.
You can simply add this link as a hyperlink on your website for convenient partner access.
Client ID & Client Secret
Credentials to be used for authenticating & authorising your app with OTTO authorisation server for fetching installation details of partner
IP Addresses
If IP addresses are specified for a credential set, requests will only be successful if they originate from those addresses. If no IP addresses are provided, the credential set will expire every 180 days.
Version
Denotes the version of the app
Version End Date
This version will remain functional until the specified date. Any changes must be scheduled at least 4 weeks in advance(Note:- Once an app version end date is set, it cannot be modified. Please contact the helpdesk if an update is required.)
Activation Date
Date when communication with partners begins for a new version release.
Extend scopes on an existing App
If you want to add more scopes to an existing app, use the "extend scopes" functionality to select the additional scopes you wish to access. When you extend the scopes, a new version of the app will be created, replicating the previous app and retaining its values. Please note that the appName cannot be edited, but all other configurations can be modified if needed.
Why extend scopes instead of creating a new app?
- You should create a new app if you have a completely new use case or functionality that you want to exclude from your general service I.e. you are implementing a completely new API interface with new functions on your site and you are expanding the range of the service that you are offering on the OTTO Market.
- However, if you only need to access new scopes while retaining the existing app configurations, extending the scopes is the preferred option.
- When you extend the scopes, a new version of the app is created, as mentioned earlier. Partners who installed the previous version will be automatically notified once the activation date is reached that a new version is available. They can then choose whether or not to install the new version.
- The main advantage of extending the scope of an existing app is the automated and simplified communication by OTTO. OTTO Market Partners will be notified via email and banners in the OTTO Partner Connect portal. This greatly reduces the communication effort required to migrate partners on your side.
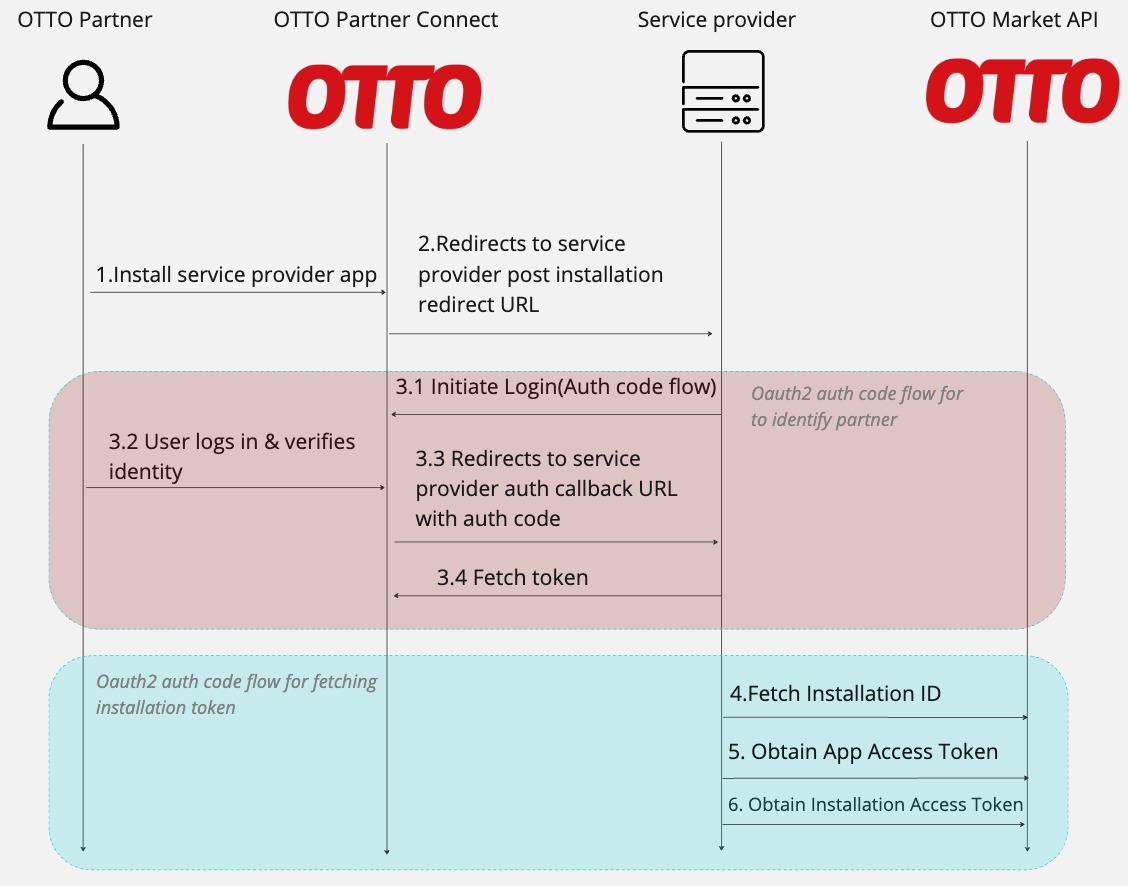
Installation of app by an OTTO Partner (Sandbox | Production)
-
Share the Installation Link with a
stateParameter (Optional)
The application's installation link can be shared with your partners in the following ways. If needed, include a "state" parameter for tracking the installer:- Through your platform or portal.
- Via an email sent to your partners.
- Through OPC for a versioned app (when upgrading via OPC, adding a
stateparam might not be possible).
Your partner then navigates to the installation link and installs the app.
Security Notes:
- If you include a
stateparameter, ensure it does not expose any sensitive data such asuserIdor similar information. Instead, consider using a secure, random, unguessable value that is only understandable by your system. This value should be valid for a limited time (e.g., 2 minutes) and should be tied to the specific installer session. - One way to achieve this is by generating a random token that can be mapped to the installer’s identity within your system. This token should be designed to be unguessable and resistant to attacks, such as using UUIDs or secure random generators.
-
Redirect to Post-Installation URL and Authenticate the Installer
After installation, your partner is redirected to your app’s post-installation URL. If astateparameter was included, it will be appended to this URL. At this point, you must authenticate the installer using your IDP.- Upon landing at the post-installation URL, authenticate the installer using your IDP.
- Once authenticated, store the installer’s identity (e.g., unique installer ID) for linking purposes.
-
Authenticate the User Against OTTO’s IDP Using OAuth2 Authorization Code Flow
After authenticating the user with your IDP, initiate the OAuth2 Authorization Code Flow with OTTO’s IDP. During this process:- Pass the installer’s identity (or a relevant identifier) as a custom query parameter in the
redirect_uri(e.g.,installer_idor similar). This is for the purpose of linking theinstallationIdobtained from OTTO to the corresponding installer ID in your system. - You can use any query parameter name (e.g.,
installer_id) in theredirect_urithat suits your needs, as long as your system understands it.
Security Recommendation for Installer Identity:
- Instead of passing the raw
installerId, consider passing an encrypted or random, unguessable token that is valid for a short time. For example, generate a token that combines a timestamp (for time-based validity) and a secure random value (e.g.,encrypt(randomToken + currentTime)). This value should only be understandable by your system and be mapped to the installer’s identity.
3.1 Redirect the User to OTTO’s Authorization Endpoint:
Use the scopesinstallationandpartnerIdto initiate the flow. For example:https://sandbox.api.otto.market/oauth2/auth?response_type=code&client_id={CLIENT_ID}&redirect_uri={YOUR_REDIRECT_URI}&scope=installation%20partnerId3.2 User Logs in and Authorizes the App:
The user logs in and verifies their identity through OTTO’s login page.3.3 Receive Authorization Code:
Upon successful authorization, your app will receive the authorization code at the specified redirect URI.3.4 Exchange the Authorization Code for an Access Token:
Make a POST request to the token endpoint to get an access token:POST /oauth2/token HTTP/1.1Host: sandbox.api.otto.market or api.otto.marketContent-Type: application/x-www-form-urlencodedgrant_type=authorization_code&client_id={yourClientId}&client_secret={yourClientSecret}&code={yourAuthorizationCode}&redirect_uri={https://yourApp/callback} - Pass the installer’s identity (or a relevant identifier) as a custom query parameter in the
For more information on implementing the OAuth2 Authorization Code Flow, please refer to the OAuth 2.0 Authorization Code section of the OAuth2 standard documentation. You can retrieve the necessary endpoints from the OpenID Connect well-known configuration:
- Sandbox Well-Known Endpoint: Sandbox Well-Known Endpoint
- Production Well-Known Endpoint: Production Well-Known Endpoint
Note:
If your app’s post-installation URL is the same as the OAuth2 callback URL, passing the installer’s ID in the redirect_uri is unnecessary, as you’ve already retained it.
-
Retrieve and Link the Installation ID with the Installer’s Identity
Once you have authenticated the user against OTTO’s IDP, retrieve the installation ID:GET /v1/apps/{appId}/installation HTTP/1.1Host: sandbox.api.otto.market or api.otto.marketAuthorization: Bearer {access_token}Response:
{"installationId": "string","appVersion": "V3","existingInstallations": [{"installationId": "string","state": "ENABLED","appVersion": "V1"}]}Note:
For first-time installations, no values will appear underexistingInstallations. Store the installation ID alongside the installer’s identity in your system. -
Fetch a Developer Access Token Using Client Credentials Flow
To fetch a developer access token, implement the Client Credentials Flow:POST /oauth2/token HTTP/1.1Host: sandbox.api.otto.market or api.otto.marketContent-Type: application/x-www-form-urlencodedgrant_type=client_credentials&client_id={CLIENT_ID}&client_secret={CLIENT_SECRET}&scope=developerReplace
{CLIENT_ID}and{CLIENT_SECRET}with your client details. -
Retrieve an Installation Access Token and Access OTTO Market APIs
With the developer access token, obtain an installation access token by making a POST request:POST /v1/apps/{appId}/installations/{installationId}/accessToken HTTP/1.1Host: sandbox.api.otto.market or api.otto.marketAuthorization: Bearer {access_token}Content-Type: application/x-www-form-urlencodedscope={SCOPE_VALUES}Response:
{"access_token": "token","expires_in": 1800}
Please note that in step 6, the Host header should be either sandbox.api.otto.market or api.otto.market. Additionally, the Authorization header should include the value Bearer {access_token} obtained in step 5.
You can now use this installation access token to authenticate your requests when accessing OTTO Market APIs. Include the access token in the Authorization header with the value Bearer {access_token} for subsequent API calls.
Please note that once the access token expires, repeat steps 5 and 6 to obtain a new access token and installation access token respectively. Use the updated tokens for continued access to OTTO Market APIs.